Strawberry Earthquake Cake
Craving a unique dessert? Discover how to make a mouthwatering strawberry earthquake cake that combines creamy goodness with fruity flavors. Try it now!

- What Makes Strawberry Earthquake Cake So Irresistible?
- The Complete Guide to Authentic Strawberry Earthquake Cake
- Why You'll Love This Version
- Health and Nutrition Highlights
- Recipe at a Glance
- Master Ingredient List
- Kitchen Equipment Essentials
- Expert Cooking Method for Strawberry Earthquake Cake
- Success Guaranteed Tips
- Perfect Presentation
- Storage and Make-Ahead
- Creative Variations
- Complete Nutrition Guide
- Expert FAQ Solutions
- Recipe Card
What Makes Strawberry Earthquake Cake So Irresistible?
Have you ever wondered how a dessert could literally "quake" your taste buds? let me introduce you to the wonder that is strawberry earthquake cake.
This delightful creation is a charming twist on a classic cake mix recipe that's so easy and fun, it feels almost like magic in your kitchen.
With around 20 minutes of prep time and just 45 minutes in the oven, this medium-difficulty cake is the kind of crowd-pleaser that turns an ordinary day into a mini celebration.
Now, why is this recipe special? well, it combines the nostalgic familiarity of yellow cake mix with the creamy richness of cream cheese and the freshness of strawberries.
You’ve got that unpredictably luscious texture that just screams for summer afternoon picnics. and don't get me started on the toppings! the optional sweetened shredded coconut and crunchy pecans add a delightful crunch that makes every bite an experience in itself.
The Complete Guide to Authentic Strawberry Earthquake Cake
This cake has roots in southern american cooking—bless those charming traditions! its rich culinary heritage ties back to creative dessert-making, where home bakers would whip up sweet delights for family and friends after hearty meals.
Originally, layered cakes were awash with flavors, each bite a testament to a baker's skill and creativity.
What's fascinating about this cake is its origin story. it's as if it appeared spontaneously one lazy afternoon, bursting with flavors and textures reminiscent of a well-kept family secret.
The “earthquake” part? well, that refers to the delicious cracks that form at the top while baking, giving it a unique appearance—and trust me, they make it even more delectable.
Culturally, this cake reflects the spirit of togetherness. it’s a quintessential summer dessert that shows up at potlucks, birthday parties, and casual weekend get-togethers.
It brings everyone to the table, making it a modern-day staple in many households.
Why You'll Love This Version
This strawberry earthquake cake stands out for its unique flavor combinations . just picture biting into a slice — the sponge is soft and moist, the cream cheese adds a zing, and every bite is punctuated with juicy strawberries.
And here’s a little secret: the technique i’m going to share with you is foolproof; trust me, i've had my fair share of baking blunders!
When i first made this cake, i overmixed the batter and thought i’d ruined everything. but it still turned out delicious, just a bit denser than i’d hoped.
It taught me that baking is about exploration—and a few happy accidents. you'll also appreciate how quick it is to prepare, thanks to handy cake mix hacks!
Health and Nutrition Highlights
Now, let’s chat about health for a moment! don’t let the sweetness fool you; there are some nutritional benefits here too.
Each slice provides a decent serving of calories and carbohydrates to fuel your day. you also get a bit of protein and healthy fats from the cream cheese and optional nuts.
Plus, using fresh strawberries adds those delightful vitamins and fiber.
If you’re mindful of your dietary choices, you can adjust this recipe as needed. it’s versatile enough for gluten-free substitutions and can even cater to nut allergies by swapping them for seeds.
So, whether you’re vegan, gluten-free, or just looking to enjoy a delicious dessert, this cake has got you covered.
Recipe at a Glance
To give you a clear picture, here’s a snapshot of what you're getting into:
- Total preparation time: 20 minutes
- Cooking time: 45 minutes
- Serving size: 12 servings
- Difficulty level: Medium
- Cost efficiency: Very wallet-friendly, especially if you shop smart!
After all this talk about the joys and benefits of making a delicious strawberry earthquake cake, it’s time to get into the nitty-gritty details—let’s gather the ingredients and start baking! trust me, you’ll want to dive right into this next part.
No one can resist such decadence when it's fresh out the oven, so let's get our hands a little floury!
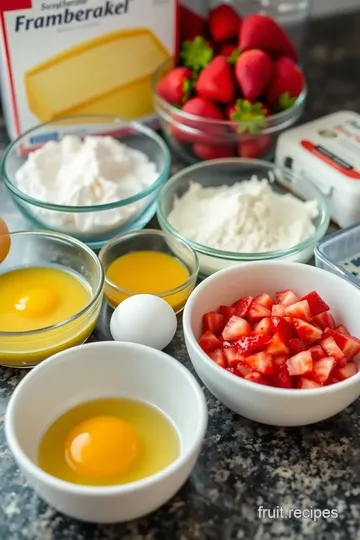
Master Ingredient List
When it comes to baking, having the right ingredients is key to unlocking tasty goodness, like that strawberry earthquake cake we've all been dreaming about.
Let’s break it down, so you’re fully prepped for a delightful baking adventure.
Premium Core Ingredients
- Yellow Cake Mix (15.25 oz) : Go for a quality brand. Look for mixes that boast real ingredients and avoid those with too many artificial additives. You'll be amazed at how much that choice shines through in the flavor.
- 1 cup Water : This is your cake’s lifeblood! Fresh, cool tap water is fine but do avoid flavored waters. Keep it simple; it’s all about those core flavors.
- 1/2 cup Vegetable Oil : Canola works well, but I often use light olive oil for a slightly different taste. It's a sneaky trick for adding flavor without overpowering the cake.
- 3 Large Eggs : Go for large, free-range eggs if you can — they’ve got rich yolks that add moisture and taste.
- 8 oz Cream Cheese (softened) : The star of the show! Look for full-fat cream cheese for that silky texture. Trust me, you don’t want to skimp here.
- 1 cup Powdered Sugar : Make sure it’s fresh; old sugar can clump and ruin your creamy dreams.
- 1 cup Fresh Strawberries, diced : Slice them up right before you mix to keep them fresh. If you find yourself out of season berries, frozen ones work in a pinch — just make sure they’re well-drained.
- 1/2 cup Sweetened Shredded Coconut (optional) : This is where you get to play around! Unsweetened works too if you prefer.
- 1/2 cup Chopped Pecans (optional) : Chopped walnuts work too! But hey, if nuts aren't your thing, just leave them out.
Signature Seasoning Blend
While the cake is the star, there are some elements that can really amp things up:
- Cinnamon : Adding a dash of cinnamon into the cake mix adds depth. It gives you that cozy, homestyle vibe.
- Fresh Vanilla Extract : A splash of good-quality vanilla will enhance all the flavors. Just don’t go overboard; too much can overpower.
- Lemon Zest : For a zesty brightness, try adding a teaspoon of lemon zest. It transforms the berry flavors beautifully!
Smart Substitutions
Now, life happens, and you might not always have every ingredient. Here’s where smart substitutions play a part:
- If you’re out of yellow cake mix, a chocolate cake mix can add a unique twist. Trust me, chocolate and strawberries are best pals!
- Got a dairy-free friend? Substitute the cream cheese and eggs with vegan options — silken tofu works well here.
- No pecans? Toss in some sunflower seeds for crunch.
Kitchen Equipment Essentials
Don’t forget to gather your tools before diving in! Here’s a quick rundown of what you’ll need:
- Mixing Bowls : Both large and medium will do. Glass or stainless steel are great options.
- Hand Mixer : A must-have! It helps beat that cream cheese to perfection without breaking a sweat.
- Measuring Cups and Spoons : Accuracy is key. Trust me — using actual measuring tools instead of eyeballing it makes all the difference in the world.
- 9x13 Inch Baking Dish : You can use glass or metal. Just make sure it’s well-greased; nobody wants stuck cake!
Pro Ingredient Tips
To store those ingredients like a pro, keep these tips in mind:
- Always keep your eggs at room temperature for a fluffier cake.
- Store flour and sugar in airtight containers to prevent pesky pests and moisture.
- If you have leftover cream cheese, freeze it in portions! Just thaw it when you're ready to bake again.
As we prepare for the next round — those mouthwatering step-by-step instructions — imagine how delightful your kitchen will smell once that strawberry earthquake cake is baking away.
It’s like a warm hug for your taste buds! let’s get to it!
Expert Cooking Method for Strawberry Earthquake Cake
So, you’ve decided to tackle a dessert that’s sure to wow your relatives – the strawberry earthquake cake! i can’t tell you how many times i’ve made this cake for family gatherings and picnics, and each time, it gets the same oohs and ahhs when it comes out of the oven.
It’s not just a cake; it’s a conversation starter! alright, let’s dive right in.
Essential Preparation Steps
Mise en Place
First things first, let’s get everything ready. gather your ingredients: a box of yellow cake mix, eggs, water, vegetable oil, cream cheese, powdered sugar, fresh strawberries (or frozen ones, if that’s what you’ve got), and if you’re feeling adventurous, some shredded coconut and pecans.
Pro tip: chop your strawberries and nuts ahead of time. this will save you a frantic dash when your cake batter is almost ready!
Prep Techniques
Make sure you have a greased 9x13 inch baking dish ready to go. i like to spray mine with non-stick cooking spray for a smooth release.
Oh, and don’t forget to preheat the oven to a cozy 350°f (175°c) before you start mixing.
Time Management
This whole process shouldn’t take more than 20 minutes, plus your baking time. i sometimes feel like a contestant on a baking show, trying to beat the clock! set aside those 20 minutes, and trust me, you'll manage it just fine.
Organization Tips
Keep your workspace tidy. i tend to grab every ingredient i might need and then lay them out. it makes the cooking process feel less overwhelming, trust me.
Messy kitchen = messy mind!
Professional Cooking Method
Step-by-Step Process
- In a big mixing bowl, whisk together your yellow cake mix, water, vegetable oil, and eggs for about 2-3 minutes until it's all blended nicely.
- Then, in another bowl, beat your cream cheese until smooth (no lumps!). Mix in the powdered sugar. It should be creamy and delightful.
- Now comes the fun part – assembling the cake! Pour half the cake batter into your greased pan. Spread it evenly and then layer those diced strawberries right on top.
- Don’t be shy, sprinkle half of your coconut and pecans over the strawberries! Next, drop dollops of your cream cheese mix on top. I like to think of it as creating little “earthquake” pockets that will ooze out delightful creaminess as they bake.
- Finish with the rest of your cake batter on top. It should look a bit chaotic, but that’s exactly what we're going for!
Temperature Control
Pop this beauty in the oven for 40-45 minutes. you’ll know it’s ready when a toothpick comes out clean. the top should look a little cracked, just like the ground after an earthquake.
It's a lovely sight!
Timing Precision
Set a timer! As tempting as it is to peek in the oven, try to hold off until the 40-minute mark. The kitchen will smell heavenly, and patience is key.
Success Indicators
Your cake is done when the center looks set and there's a light golden brown crust. If you’ve followed the steps, you’re in for a real treat!
Expert Techniques
Professional Methods
- Always prep your cream cheese to room temperature. It really does make a difference! Cold cream cheese creates lumps that just won’t go away.
- Avoid overmixing the cake batter; it makes the cake dense. Remember, just mix until everything is combined!
Critical Steps
Let it cool for a good 10-15 minutes in the pan after baking. I once took mine out too soon, and it fell apart – talk about a cake catastrophe!
Precision Points
For optimal results, use a toothpick; if it comes out with a few moist crumbs, you’re golden.
Quality Checks
If you can’t resist a little nibble, cool it completely before digging in. Serve warm or let it chill – both are delightful!
Success Strategies
Troubleshooting Tips
If the cake isn’t rising the way you’d like, check that your ingredients are fresh. Old baking powder can ruin your day.
Quality Assurance
Taste test for sweetness. Depending on your strawberries, you might want to add a pinch more sugar.
Perfect Results Guide
Garnish the cake with fresh strawberry slices, a sprinkle of coconut, or even serve it with whipped cream. I promise you, it feels like summer – even in the middle of a gloomy day!
Before we wrap up our strawberry earthquake cake escapades, there's a lot more to discover! in the next section, i’ll share some variations you can try, plus ideas for pairings that can truly elevate this delightful dessert.
Whether you're thinking of a nut-free alternative or dreaming of different fruit pairings, stay tuned for more delicious tips!
Success Guaranteed Tips
Professional Insights
Baking can often feel like a high-stakes endeavor, especially when you’re reaching for something as delightful as a strawberry earthquake cake.
From my own kitchen adventures, i’ve discovered that the secret to success is using room-temperature ingredients . it really makes a difference! and a little patience when mixing goes a long way—overmixing is a quick trip to tough cake town, and we don’t want that.
Expert Techniques
When it comes to layering flavors, think of your cake batter as a cozy blanket for your strawberries. i like to gently fold them in rather than just dumping them in haphazardly.
It keeps everything evenly distributed and avoids a clump of fruit at the bottom. trust me, it might sound trivial, but it totally matters!
Kitchen Wisdom
One of the best-kept secrets in my baking toolkit is weighing your ingredients when possible. it ensures consistency, especially with flour.
Plus, it's surprisingly satisfying. that said, if the scale isn’t your thing, stick to proper measuring cups and spooning flour into them without packing it down.
Success Guarantees
Just remember : let your cake cool slightly before serving. that balance between warm and cooled is crucial for perfecting the experience.
You’ll thank me later when the cream cheese layer is ooey-gooey and dreamy!
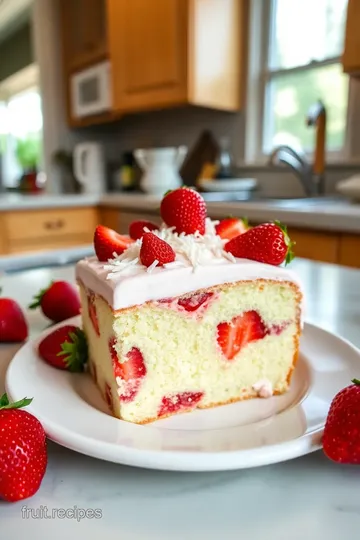
Perfect Presentation
Plating Techniques
Ready for your cake to look as good as it tastes? use a serrated knife or a cake leveler to slice your strawberry earthquake cake evenly—it makes a world of difference! for that fancy restaurant vibe, try to stack a couple of pieces if you’re feeling adventurous.
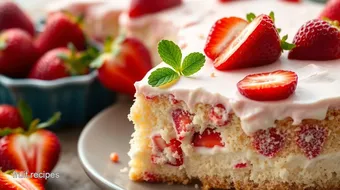
Garnish Ideas
Fresh slices of strawberries on top are an absolute must, but you can jazz it up with a sprinkle of shredded coconut or chopped pecans for that extra crunch.
And let’s not forget about drizzling a bit of melted chocolate over the top—it’s like a little hug for your cake!
Serving Suggestions
Don’t just serve this beauty straight from the baking dish, though—try putting it on a cute cake stand. it’s a small touch that adds a lot of flair to your table.
Add a scoop of vanilla ice cream piled next to it, and you’ll have everyone clamoring for seconds!
Visual Appeal Tips
Lighting is everything, friends. natural light will make your cake shine—so snap that pic right before sunset. the side view is always a winner with a little angle for dramatic effect, capturing those luscious layers and inviting colors.
Storage and Make-Ahead
Storage Guidelines
This cake is best enjoyed fresh, but if you happen to have leftovers, keep it in an airtight container. honestly, though, i’ve never had a lot of luck with leftovers, so keep your expectations reasonable.
Preservation Methods
You can freeze slices! just make sure they’re wrapped tightly in plastic wrap and then in aluminum foil. when you pull them out, allow them to thaw at room temperature for a day—it’ll be like unwrapping a little treasure.
Reheating Instructions
Don’t rush the reheating process. you can pop a slice in the microwave for 15-20 seconds to take off the chill.
If you have a little whipped cream serve it warm, because who doesn’t love a warm dessert?
Freshness Tips
To keep your strawberries fresh, don’t wash them until you’re ready to use them. The moisture can lead to quicker spoilage. A little prep in advance makes a difference!
Creative Variations
Flavor Adaptations
Feel free to swap out strawberries for other fruits. Blueberries become a juicy twist, or if you’re in the mood for peach, trust me, summer will sing!
Dietary Modifications
If you need to cater for gluten-free diets, simply use a gluten-free cake mix. There are awesome alternatives out there that don’t skimp on flavor.
Seasonal Twists
During fall, I love adding in some pumpkin spice for an autumn vibe. It transforms the whole cake into a seasonal favorite, especially with some rich cream cheese frosting!
Regional Variations
Embrace your regional flair! Adding local fruits, like blackberries or raspberries, can make this cake personal and special.
Complete Nutrition Guide
Detailed Breakdown
For each slice of your strawberry earthquake cake, you’re diving into an enticing mix of flavors. A serving typically contains around 280 calories with 12 grams of fat, but hey, that's the joy of dessert !
Health Benefits
Strawberries bring a healthy kick to this cake—they're packed with antioxidants and Vitamin C, too!
Dietary Information
To make things easier, always check for specific needs like gluten-free or nut allergies—your guests will thank you for it!
Portion Guidance
12 servings from a 9x13 inch cake feels just right , but who am I to tell you not to go in for that bigger slice?
Expert FAQ Solutions
Common Concerns
So, you might be thinking: "Will my cake sink in the middle?" That can happen if you open the oven too soon or your baking powder is expired.
Expert Answers
Trust that it’s okay to use frozen strawberries! Just make sure they’re thawed and drained, so they don’t water-down your batter.
Troubleshooting Guide
If your cake isn’t rising, check your oven temperature—sometimes our ovens can be temperamental. An oven thermometer can be a great investment.
Success Tips
Finally, keep a notebook of what works and what doesn’t for you. It makes the whole process less intimidating and more of a fun exploration.
In conclusion, making a strawberry earthquake cake can be a heartfelt and delightful experience that hugs your taste buds, lifts your spirits, and brings a smile to everyone around.
With these tips, tricks, and handy insights, i just know you’ll be a dessert superstar in no time. happy baking, friends!

Strawberry Earthquake Cake Card
⚖️ Ingredients:
- 1 (15.25 oz) box of yellow cake mix
- 1 cup water
- 1/2 cup vegetable oil
- 3 large eggs
- 1 (8 oz) package cream cheese, softened
- 1 cup powdered sugar
- 1 cup fresh strawberries, diced
- 1/2 cup shredded coconut (optional)
- 1/2 cup chopped pecans (optional)
- 1 cup sweetened shredded coconut (optional)
- 1/2 cup chopped pecans (optional)
- 1/2 cup strawberries sliced, for garnish
🥄 Instructions:
- Step 1: Preheat your oven to 350°F (175°C). Grease and flour a 9x13 inch baking dish or spray it with non-stick cooking spray.
- Step 2: In a large mixing bowl, combine the yellow cake mix, water, vegetable oil, and eggs. Mix well with a hand mixer or whisk until smooth and well combined, about 2-3 minutes.
- Step 3: In another bowl, beat the softened cream cheese until smooth. Add the powdered sugar and mix until well combined. You should have a creamy mixture without lumps.
- Step 4: Pour half of the cake batter into the prepared baking dish and spread evenly. Add the diced strawberries evenly over the cake batter. If using coconut and pecans, sprinkle half of them on top of the strawberries.
- Step 5: Take dollops of the cream cheese mixture and place them atop the strawberries. Do not spread it out; it will sink as it cooks.
- Step 6: Pour the remaining cake batter over the top to cover.
- Step 7: Place the baking dish in the preheated oven and bake for 40-45 minutes or until a toothpick inserted into the center comes out clean.
- Step 8: Remove the cake from the oven and allow it to cool in the pan for about 10-15 minutes. Before serving, garnish with fresh strawberry slices, additional shredded coconut, and chopped pecans if desired.
Previous Recipe: Xango Dessert: 5 Ways to Enjoy this Amazing Treat
Next Recipe: Strawberry Milkshake Strain: 5 Best Recipes for a Creamy Delight