Refreshing Raita with Seasonal Fruits and Vegetables
Craving something cool? This Refreshing Raita with seasonal fruits and veggies is my go-to! Perfect with biryani or on its own. Let's make it together!

Cool as a Cucumber: An Introduction to Refreshing Raita
You ever have one of those scorching summer days where just the thought of turning on the oven makes you sweat? yeah, me too! or maybe you’ve thrown a barbecue and everything's heating up so fast, you wish for something chilled to cut through the spice.
That’s where refreshing raita comes in like a superhero. this dazzling indian side dish is a creamy, cool delight made from yogurt that just screams summer, and trust me, once you make this, you'll be the star of every cookout.
Let’s dive into this beautiful union of flavors and textures!
The Magic of Raita: A Recipe Overview
Raita has been around forever and is a staple in indian cuisine sides . it’s like the cool cousin who always balances out the spiciness of heavy dishes—think biryani or pulao.
Historically, raita was created as a refreshing antidote to intense spices. and let’s be real, who doesn't love a savory yogurt dip to tame the heat? fast forward to today, and its popularity continues to soar.
You can find it at potlucks, bbqs, and even a cozy dinner at home.
Creating this dish is a breeze; it's classified as easy ! it only takes about 10 minutes if you’re a pro at chopping (or, let’s be honest, if you’ve got a good knife).
You can whip it up with a handful of fresh ingredients. plus, this recipe serves around 5 people —perfect for sharing or for meal prepping those lunches that might otherwise be, oh i don’t know, a bore !
In terms of cost, you’re looking at a minimal grocery bill since vegetables and fruits, especially seasonal ones, are generally on the affordable side.
So you can eat deliciously without breaking the bank!
Why Raita Rocks: Key Benefits
So, why should you give raita a place on your table? first off, it’s packed with health benefits . yogurt is loaded with probiotics that are great for gut health.
Plus, it’s a fantastic source of protein and calcium. the crunchy cucumbers and vibrant pomegranate are not just pretty; they add a nutrient-rich boost to your meal.
Talk about delicious and nutritious!
This dish shines at summer get-togethers or even as a light appetizer for gatherings. whether you're serving it alongside spicy barbecue or alongside some crispy snacks during movie night, it never disappoints .
And let’s not forget about presentation—just picture this colorful salad melding vibrant greens, juicy reds, and creamy whites. seriously, it’s like a party in a bowl!
Also, if you wanna keep everything plant-based, there’s always the option for a vegan raita variation . swap regular yogurt for coconut or almond yogurt, and voilà! you just leveled up your game.
Wrap It Up with Fresh Ingredients
The star players here are fresh herbs, seasonal fruits, and crunchy veggies that make this dish not just refreshing but also an eye-catching centerpiece on any table.
It's like bringing mediterranean vibes to your next summer bash with a twist of indian flavor. oh, and if you want a quick fix, just throw in whatever seasonal ingredients you've got on hand—no rules, just right!
So, as we gear up to jump into the ingredient list, just think about popping open that yogurt, chopping those colorful veggies, and tossing everything together to whip up this tasty plate.
It's honestly that simple! now, let’s get right into what you’ll need to get this bowl of happiness started.
Essential Ingredients Guide for Refreshing Raita
Hey there, friend! ready to dive into the colorful world of raita? it’s not just any dish; it’s a cooling indian delight that pairs perfectly with spicy meals.
Let’s break down everything you’ll need to make a fresh and tasty raita with seasonal fruits and vegetables . trust me; this vibrant dish is like a hug for your taste buds!
Premium Core Components
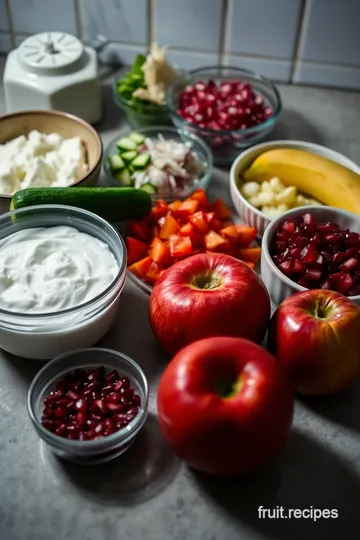
First things first , your premium ingredients matter. for this raita, you’ll need 500 g of thick curd (yogurt) . when picking your yogurt, go for the thick stuff; it'll give you that creamy consistency that makes raita so dreamy! look for the best by date , and check the texture.
It should be smooth with a pleasant smell (not sour, okay?).
Next up is the fresh produce. go grab yourself 1 medium cucumber , 1 ripe banana , 1 juicy tomato , 1 apple , and 1 cup of pomegranate seeds .
When shopping, remember : freshness is key! the cucumber should be firm, and the pomegranate seeds bright red. tip alert : you can also swap out the apple for something fun, like a mango, for a tropical twist!
Finally, let's not forget storage. after whipping up your raita, store it in the fridge and enjoy it within 24 hours for the freshest taste.
Pro tip: putting your raita in an airtight container will keep it in top shape!
Signature Seasoning Blend
Now, let’s talk seasoning. this is where magic happens! you’ll want 1/2 tsp of roasted cumin powder, salt to taste, sugar (optional), and 1/2 tsp of black pepper powder .
Honestly, the roasted cumin adds a warm, nutty flavor that elevates your raita to the next level.
Feeling a little adventurous? Try fresh herbs like mint and coriander; they add brightness and depth. You can also spice things up with a pinch of chili powder or even try a Vegan Raita variation using coconut yogurt!
Smart Substitutions
We all know plans can change. what if you can’t find pomegranate seeds? no worries! common alternatives like diced mango or even strawberries can work wonders.
If you need gluten-free options, swap out any pita bread for crisp vegetable sticks.
And if you’re working with allergies or dietary restrictions, check this out: use coconut yogurt for a dairy-free version or skip the sugar if you're trying to keep it low-cal.
This raita is so versatile, it’ll adapt to whatever you throw at it. think of it as your trusty sidekick in the kitchen!
Kitchen Equipment Essentials
Don’t let fancy gadgets intimidate you! for this raita, all you need is a mixing bowl, a hand whisk, and a sharp knife .
Simple, right? if you're feeling fancy, you can use a handheld mixer to whisk your yogurt until it's extra creamy.
Just make sure to keep your workspace tidy!
For storage solutions, I like to use jars. They not only look cute but also keep everything fresh. Just pop it in the fridge, and you're good to go!
Getting Ready to Make Raita!
Oh my gosh, i can almost taste that creamy, tangy goodness! now that we’ve gathered our ingredients and tools together, let's get into the fun part—making it! trust me, once you've got your refreshing raita on the table, it’ll steal the show and leave your taste buds singing.
Stay tuned for the step-by-step instructions that’ll help you whip up this crowd-pleaser in no time! You and your friends will love the nutritional benefits of yogurt and the cooling effects it brings to any spicy dish—just what you need on a hot summer day! Let's get cooking!
Master the Art of Professional Cooking
Alright, friends! look into into the world of professional cooking methods with me. we’re talking refreshing dishes that not only taste amazing but also look stunning on your plate.
Today, we’ll tackle the essentials of preparation that make all the difference, especially when whipping up something delicious like raita with seasonal fruits and veggies.
Essential Preparation Steps
First up, let’s chat about mise en place . it sounds fancy, but it’s just a way of saying, “have your stuff ready.
” gather your ingredients, chop that cucumber, peel that orange, and have your spices on hand. this sets you up for success and makes cooking way less stressful.
Trust me, there’s nothing worse than scrambling for ingredients while your pot simmers away!
Next is time management . think about how long each component of your dish takes. for our raita, chopping all those fruits and veggies takes about 5- 7 minutes .
So, plan accordingly! it helps to have a little timer ticking away just in case you forget. the last thing you want is overcooked ingredients in your vegetable raita .
Now, let’s talk about organization strategies . keep your workspace tidy! it's easier to cook when you’re not digging through a mountain of pans.
A clean station lets the creativity flow without distractions. and hey, safety is key! always be cautious with those sharp knives—no one wants a trip to the er after prepping for dinner.
Step-by-Step Process
Now to the good stuff. Here’s your step-by-step process .
-
Prep that curd : start by whisking 500 g of thick curd (or yogurt) until it’s nice and creamy. you want it smooth, like that creamy layer on a perfect cucumber salad with yogurt .
-
Chop Away : Grab your knife and chop that cucumber and other fruits. Make them bite-sized—around 1-inch chunks are perfect. Aim for a colorful medley; it makes anything look Instagram-ready!
-
Mix It Up : Toss those chopped goodies into the curd, add the juice of one orange, and mix it all together. This is where magic happens!
-
Spice it right : sprinkle in that ½ tsp roasted cumin powder , salt, sugar (if you need a touch of sweetness), and ½ tsp black pepper .
Don’t forget those fresh herbs—chopped mint and coriander go a long way here.
-
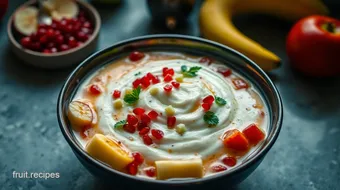
Serve like a pro : transfer everything into a beautiful bowl, garnish with more herbs, and voila! you’ve made a colorful, nutrient-rich side that pairs perfectly with biryani or even just a simple plate of roti .
Expert Techniques
To really level up your cooking game, here are some expert techniques . always taste as you go. this isn’t school; there’s no test at the end! adjust seasoning as needed.
A little more cumin? go for it. too salty? add a bit more yogurt.
Watch your temperature —if you're cooking something that involves heat, keep things at a steady simmer; don’t let it boil over. Cooking is all about patience, baby!
And if something goes awry, don’t freak out! If your Raita smells funky, it could just be the yogurt. Trust your instincts and adapt. Some extra chopped veggies can save the day!
Success Strategies
Let’s wrap this up with some success strategies . A common mistake is not adjusting spices—start light, seasoning to your taste throughout the process. Remember, adding too much later on is tough!
Enjoy the journey. Cooking is about experimentation. For make-ahead options, whip up Raita a few hours prior to dinner—it gets better with time, trust me.
And hey, if you’re thinking ahead for summer picnics, this Raita is your best friend. It’s cool, refreshing, and an excellent counterpoint to those spicy dishes we love putting on our plates.
As we wind down, I’ll keep my eyes open for additional information on mastering Indian cuisine and cool dishes that tickle your taste buds. So let’s stay tuned and keep cooking, folks!
Pro Tips & Secrets
Alright, let’s dig into the refreshing world of raita —that cool, creamy dish that brings a delightful balance to your meals! it’s not just about tossing everything together; there are some pro tips that’ll up your raita game.
First off, trust me, always chill the curd before mixing it. oh my gosh, there’s nothing quite like the sensation of cold raita on a hot day! just pop it in the fridge for about 30 minutes before prep.
Now, when it comes to flavor enhancement, don’t skimp on the spices. a sprinkle of roasted cumin powder is a game changer.
It brings that earthy depth that matches perfectly with the zing of cucumbers and sweetness of fruits. plus, if you’re like me and love that extra kick, try adding a pinch of chili powder .
It’s like a party in your mouth!
And let’s not forget about presentation! i always say, eat with your eyes first. so, toss in some fresh herbs and make those vibrant colors pop.
A dash of fresh mint and coriander not only garnishes your dish but also turns an ordinary raita into an eye-catching centerpiece on your table.
Perfect Presentation
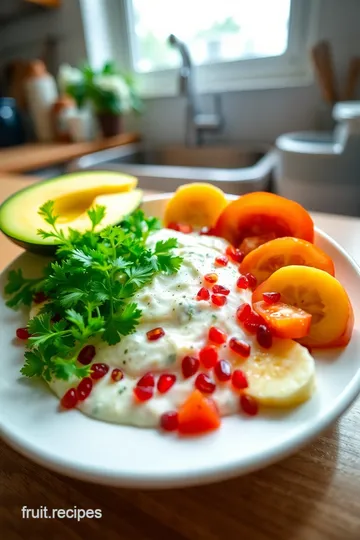
Speaking of presentation, plating can be fun! use a nice wide dish to showcase your colorful salads . the mix of the green cucumber, red pomegranates, and yellow banana creates this lovely visual appeal.
For extra flair, why not swirl some yogurt on top with a sprinkle of cumin? it’s like an edible work of art!
Here’s a cool garnish idea: try using edible flowers or even some pomegranate seeds on top. these not only look stunning but also add a pop of flavor.
Oh, and remember to balance the colors; you want your raita to look as lively as a summer picnic.
Storage & Make-Ahead
We all know life gets busy, so having a plan is key. you can easily make this raita ahead of time —just stick it in the fridge and enjoy it the next day! but here’s a tip: store it in an airtight container to keep it tasting fresh.
It’ll stay good for about 24 hours , but after that, the toppings might get a bit soggy.
When you’re ready to serve, give it a good stir and maybe add a little more salt or cumin if needed.
You’ll want to serve it chilled , so avoid letting it sit out too long . if you happen to have any leftover raita, you can totally use it as a low-calorie dipping sauce with veggies—yum!
Creative Variations
Now, let’s get wild with some creative variations ! you can totally change things up based on what’s in season.
Use mango when it’s ripe, or add a handful of berries for a twist. the beauty of curd-based recipes like this one is that they’re super adaptable.
Got some leftover grilled vegetables? toss those in! you can even make a vegan raita variation by swapping out the yogurt for coconut yogurt.
I promise, it brings a whole new tropical vibe without missing the creamy goodness.
Complete Nutrition Guide
Wondering about all the goodness in this dish? let’s break it down. first off, have you heard about the nutritional benefits of yogurt ? it’s packed with protein and probiotics that help with digestion.
Toss in fruits and veggies, and you’ve got yourself a nutrient-rich side dish everyone will love.
For those mindful about portions, this raita is a great way to enjoy healthy indian appetizers without overindulging. you can feel good about serving it with a meal or as a refreshing snack.
Expert FAQ Solutions
You might still be wondering, “what if my raita turns out runny?” here’s the deal: try using thicker curd or let it drain a bit.
If you’ve made yours too thick, a splash of orange juice can loosen it up perfectly.
And for those who like it sweeter, just add a dash of honey or sugar. you know your taste buds better! as for serving suggestions, it pairs well with spicy dishes, almost like a cooling embrace on your tongue after a kick of heat.
Now, don’t stress too much about making it perfect. Raita is meant to be easy-going!
So there you have it! a quick rundown on how to whip up a phenomenal refreshing raita with seasonal fruits and vegetables .
Remember, cooking should be about fun and creativity. look into into this dish, make it your own, and get ready to impress! happy cooking, my friend!
Refreshing Raita with Seasonal Fruits and Vegetables Card
⚖️ Ingredients:
- 500 g thick curd (yogurt)
- 1 medium cucumber, chopped
- 1 medium onion, finely chopped (optional)
- 1 medium tomato, chopped
- 1 cup pomegranate seeds
- 1 medium ripe banana, chopped
- 1 medium apple, chopped
- Juice of 1 orange (as needed)
- 1/2 tsp roasted cumin powder
- Salt to taste
- Sugar to taste (optional)
- 1/2 tsp black pepper powder
- Fresh coriander leaves, chopped (to taste)
- Fresh mint leaves, chopped (to taste)
🥄 Instructions:
- Step 1: In a mixing bowl, whisk the thick curd until smooth and creamy.
- Step 2: Using a sharp knife and chopping board, chop the cucumber, optional onion, tomato, banana, and apple into bite-sized pieces.
- Step 3: Add the chopped fruits and vegetables to the whisked curd. Pour in the orange juice and gently mix until evenly combined.
- Step 4: Sprinkle in the roasted cumin powder, salt, sugar (if using), and black pepper. Fold in the chopped coriander and mint leaves.
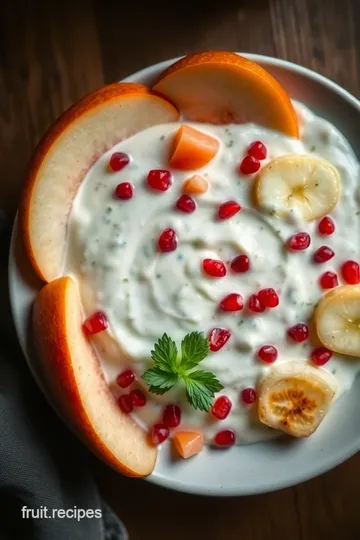
- Step 5: Transfer the Raita to a serving bowl. Garnish with extra herbs if desired.
Previous Recipe: How to Make the Best Creamy Dragon Fruit Milkshake
Next Recipe: How to Make My Grandmother's Creamy Summer Macaroni Salad